

10 Tips for Choosing Rigid Boxes with Lids
Choosing rigid boxes with lids is not merely a matter of color, gloss, or a satisfying magnetic snap. The box must protect the product, fit the brand, and survive handling from the factory to the customer’s table. Packaging pioneer William Lever offered a useful standard: “The package must protect what it sells and sell what it protects.” That principle gives this guide its direction. The following ten tips examine board grade, lid construction, dimensions, inserts, finishes, sustainability, supplier capability, and quality control. Small decisions matter. A two-millimeter gap can make a premium lid feel careless.
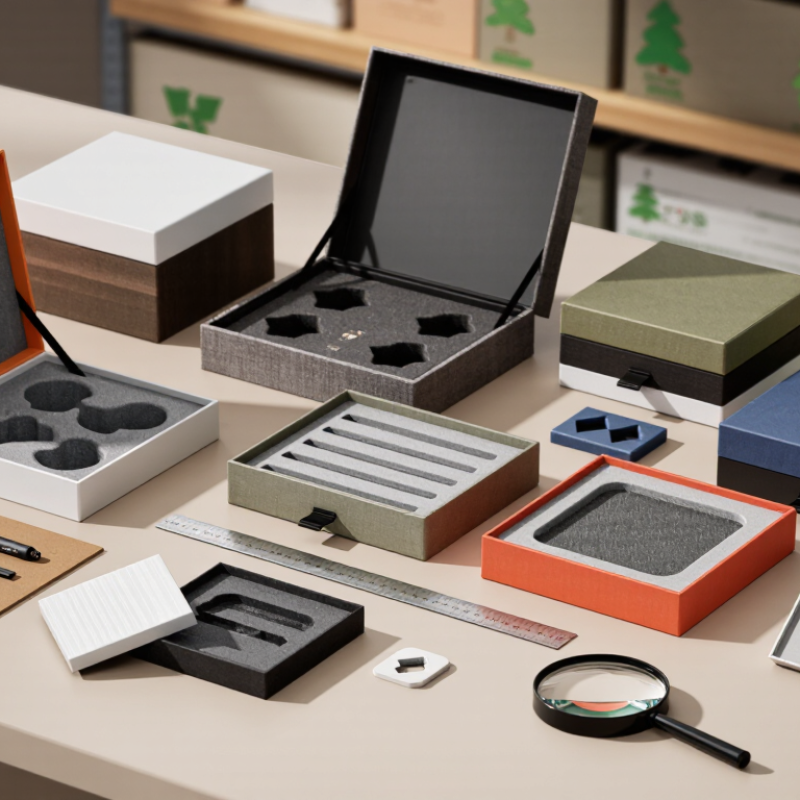
Practical evaluation starts with a physical sample. Measure the inner cavity, test the closure repeatedly, and place the packed box under light compression. Check whether corners crush, fabric lifts, or printed edges reveal white paper. Ask for material specifications, production tolerances, and documented sourcing. FSC-certified paper may support a responsible claim, but certification should be verified rather than assumed. A reliable supplier should explain these details clearly. Ideally, request a preproduction sample before approving thousands of units.
This guide also leaves room for doubt. A beautiful prototype can fail in humid storage. A lower-cost option can become expensive after returns, damage, or rushed replacements. I have seen teams focus on foil stamping while overlooking an insert that scratches the product. That mistake is easy to repeat. Use the ten tips as a decision framework, not a rigid formula. Compare appearance with performance, and ask what the customer will feel at opening. The best rigid boxes with lids create confidence before the product is touched.
Define Box Purpose, Product Dimensions, and 1.5–3 mm Board Thickness
10 Tips for Choosing Rigid Boxes with Lids
Define the box purpose before choosing materials. A rigid box for jewelry needs different protection from one holding a ceramic item. Consider stacking, gifting, shipping, opening frequency, and display position. Product dimensions should describe the actual item, not only its marketing size. Leave practical clearance for tissue, inserts, and hand removal. A tight fit looks precise, but it can damage corners during packing.
Board thickness strongly affects rigidity and perceived value. For many rigid boxes with lids, 1.5–3 mm board provides a useful working range. Smaller boxes may perform well at 1.5 mm, while larger lids often need 2–3 mm to resist bending. However, thickness alone does not guarantee strength. Paper density, corner construction, adhesive quality, and lid depth also matter. I would not trust a specification sheet without a physical sample.
Eurostat reported 188.7 kg of packaging waste per person in the European Union in 2021. Paper and cardboard represented about 40.9% of that total, showing why material efficiency deserves attention. Use accurate dimensions to avoid unnecessary board, filler, and transport volume. The Sustainable Packaging Coalition also recommends evaluating packaging through its full life cycle, not appearance alone. A beautiful box can still be poorly designed. Test packed samples under stacking, vibration, and repeated opening. Small failures often appear after production, when changing the structure becomes expensive.
10 Tips for Choosing Rigid Boxes with Lids - Define Box Purpose, Product Dimensions, and 1.5–3 mm Board Thickness
| Tip | Decision Dimension | What to Determine | Practical Guidance and Realistic Data | Quality Check |
|---|---|---|---|---|
| 1 Define the box purpose | Primary use | Clarify whether the box is intended for retail presentation, gifting, storage, shipping, or repeated reuse. | Presentation boxes can prioritize appearance and fit. Boxes used for transport require stronger board, protective inserts, and suitable outer packaging. | Write down the required protection level, opening frequency, display position, and expected service life. |
| 2 Measure the product accurately | Product dimensions | Record the product length, width, height, protrusions, accessories, and any protective wrapping. | Measure the packed product rather than relying only on nominal product dimensions. Allow approximately 2–5 mm of functional clearance per side, depending on the insert and product shape. | Place a physical sample inside a prototype and confirm that it is secure without excessive pressure. |
| 3 Select the board thickness | Rigid board specification | Choose the board thickness according to box size, product weight, stacking requirements, and lid construction. | A 1.5–2.0 mm board is commonly suitable for small, lightweight presentation boxes. A 2.0–3.0 mm board generally provides greater rigidity for larger or heavier formats. | Check panel flatness, corner strength, lid fit, and resistance to bending after assembly. |
| 4 Choose the box style | Construction format | Compare a separate-lid box, shoulder-neck box, lift-off lid, drawer box, or hinged-lid construction. | Separate lids are versatile and easy to customize. Shoulder-neck designs improve lid alignment. Hinged lids support frequent opening, while drawer formats require accurate sliding tolerances. | Open and close the sample repeatedly to check alignment, friction, and movement of the lid or drawer. |
| 5 Plan the internal insert | Product positioning | Decide whether the product needs a molded tray, paperboard insert, foam, fabric lining, or a simple wrapped compartment. | The insert should prevent movement while avoiding concentrated pressure on fragile areas. Use separate cavities when several items could scratch or collide. | Perform a shake test and a gentle drop test with the packed product to identify movement or impact points. |
| 6 Match the box size to logistics | Shipping efficiency | Consider carton dimensions, pallet utilization, dimensional weight, and the amount of empty space around the rigid box. | A close-fitting box reduces filler and internal movement. However, leave enough room for the insert and protective packaging; a tight fit can damage corners or the product. | Test the packed box in the intended shipping carton and review total packed weight and outer dimensions. |
| 7 Select the surface finish | Appearance and handling | Choose between uncoated paper, matte film, gloss film, textured paper, embossing, foil, or spot coating. | Matte surfaces reduce glare and fingerprints. Gloss surfaces provide stronger shine but may show scratches more easily. Textured papers can improve grip and perceived tactility. | Review a physical finish sample under retail lighting and inspect scuffing after repeated handling. |
| 8 Check lid tolerance | Opening performance | Balance a secure closure with easy opening, considering the board thickness, wrap material, insert height, and humidity. | The lid should not rattle during handling or require excessive force. A prototype is essential because paper wrapping and board compression can change the final fit. | Test the lid at room temperature and after storage in a moderately humid environment. |
| 9 Review structural durability | Strength and protection | Inspect corners, edges, joints, wrapped seams, lid panels, and the base for possible deformation. | For heavier products, distribute the load across the base instead of relying only on the paper wrap or insert. Reinforced corners and a thicker board may be appropriate for larger formats. | Conduct compression, repeated-opening, vibration, and low-height drop checks based on the intended handling conditions. |
| 10 Confirm production and sustainability details | Manufacturing readiness | Verify minimum order quantity, tooling, assembly method, material composition, recyclability, and final inspection criteria. | Use material combinations that can be separated where recycling systems require it. Confirm whether films, magnets, foams, coatings, or metal accessories affect disposal or recovery. | Approve a pre-production sample and check dimensions, color, surface defects, board thickness, insert fit, and packaging before volume production. |
Related Posts
-
2026 Top Types of White Rigid Boxes for Buyers?
-
How to Choose the Best Chipboard Packaging Boxes for Shipping?
-
Top 10 Benefits of Paperboard Packaging for Sustainable Business Solutions
-
How to Choose the Right Folding Carton Styles for Your Packaging Needs?
-

Top Box Manufacturers to Consider in 2026 for Global Buyers?
-

How to Choose the Best Rigid Box Printing Service for Your Business Needs
